Invite teammates and manage access
Set up a ti-ny.link team, invite collaborators and check access to links, QR codes and projects before starting a shared campaign.
Last reviewed:
Collaborate on links and campaigns
Teams let colleagues work together without sharing a login. Before creating a team, check your account's team and member allowances on the current plan screen.
Create a team and invite a colleague
Open Teams
Open the profile menu at the bottom of the sidebar, choose Teams, then My teams. The separate Teams' member area lists teams you have joined.
Create and name the team
Choose Create team and use a name that identifies the client, brand or group working together.
Invite the collaborator
Use the invitation controls to add the colleague's email address. Ask them to follow the invitation using their own account.
Review the available access controls
Select the permissions offered in your team settings for the work they need to do. Review the affected features before saving.
Check access before the campaign
Ask the invited colleague to open the intended links, QR codes or projects. Confirm they can perform the agreed work and review access again when responsibilities change.
Understand the invitation permissions
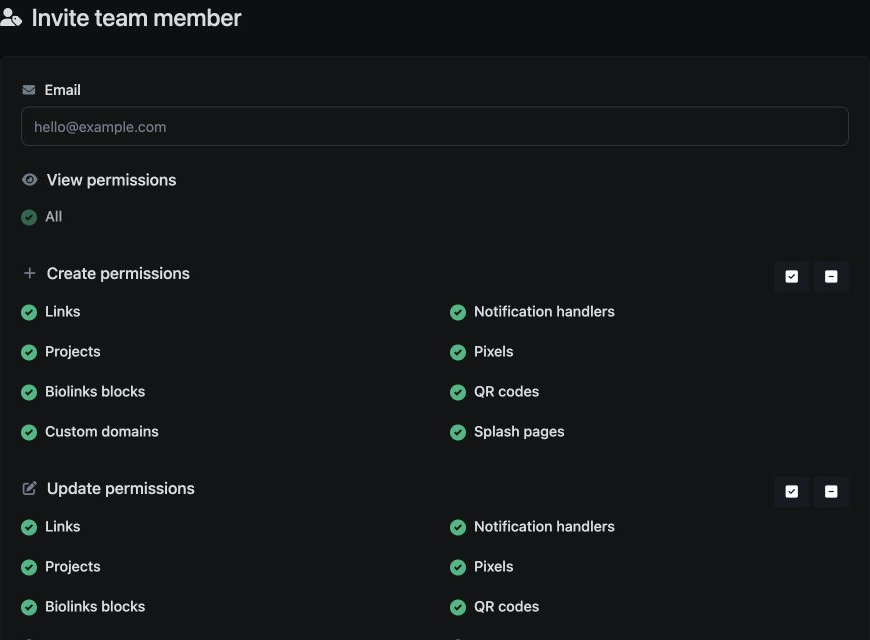
Team invitations include separate View, Create, Update and Delete permission groups. View permissions → All is checked and disabled in the form. The other groups expose resource checkboxes, with their options preselected by default.
| Permission group | Controls shown in the invitation form |
|---|---|
| View | All, selected and disabled; the form does not offer a narrower read selection. |
| Create | Links, Notification handlers, Projects, Pixels, Biolinks blocks, QR codes, Custom domains and Splash pages. |
| Update | Links, Notification handlers, Projects, Pixels, Biolinks blocks, QR codes, Custom domains and Splash pages. |
| Delete | Links, Notification handlers, Projects, Pixels, Biolinks blocks, QR codes, Custom domains, Splash pages and Data. |
Review each selected checkbox before sending an invitation, particularly Delete and Data. The form states that invited users cannot access account settings, payments or logs.
Check the read scope before adding clients
The fixed View → All setting needs particular care when several clients share one account. Projects organise resources; the invitation form does not offer view permissions for an individual project. Review what clients can see before inviting them.
Before inviting a client, test the permissions with a colleague’s account. Check which resources they can view, edit and delete, especially when several clients share one account.
Decide what each person needs
Choose permissions to match each colleague’s responsibilities.
| Collaborator | Work to agree before granting access |
|---|---|
| Campaign manager | Create and update campaign links and review their activity |
| Designer | Prepare QR artwork and test the exported codes |
| Reporting colleague | Review available statistics for the relevant campaign |
| Client contact | Confirm the content, destination and reporting they need to see |
Start with the access required for the task. Check who can edit or delete shared resources, especially links used in printed materials. Keep an agreed record of who maintains each campaign.
Organise the team's work
Projects help group related work. Review team access separately and verify the invited account's experience before using a setup for client work.
For an example combining campaign links, QR codes and reporting, see ti-ny.link for marketing agencies.
Change or remove access
When someone changes role or leaves a project, update their membership and permissions in the team settings. Check the change with the account owner and confirm the affected member has the intended access.